New tool: Mess with DNS!
Hello! I’ve been thinking about how to explain DNS a bunch in the last year.
I like to learn in a very hands-on way. And so when I write a zine, I often close the zine by saying something like “… and the best way to learn more about this is to play around and experiment!”.
So I built a site where you can do experiments with DNS called Mess With DNS. It has examples of experiments you can try, and you’ve very encouraged to come up with your own experiments.
In this post I’ll talk about why I made this, how it works, and give you probably more details than you want to know about how I built it (design, testing, security, writing an authoritative nameserver, live streaming updates, etc)
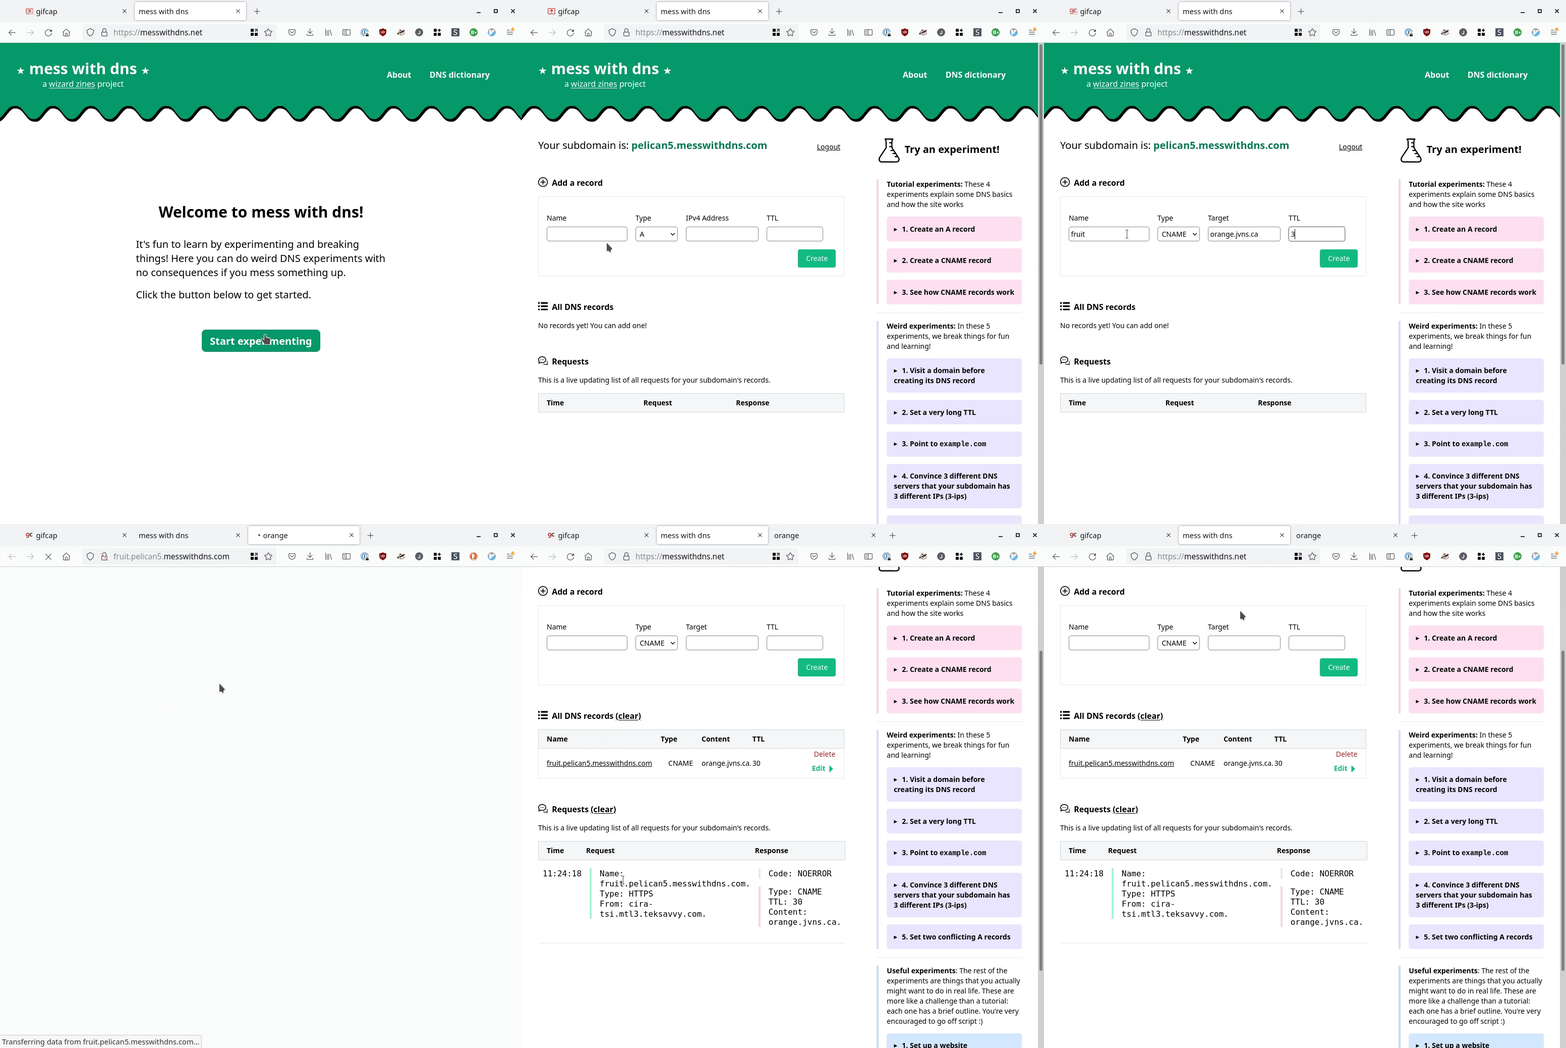
a screencast
Here’s a GIF screencast of what it looks like to use it:
it’s a real DNS server
First: Mess With DNS gives you a real subdomain, and it’s running a real DNS
server (the address is mess-with-dns1.wizardzines.com). The interesting thing about DNS
is that it’s a global system with many different computers interacting, and so
I wanted people to be able to actually see that system in action.
problems with experimenting with DNS
So, what makes it hard to experiment with DNS?
- You might not be comfortable creating test DNS records on your domain (or you might not even have a domain!)
- A lot of the DNS queries happening behind the scenes are invisible to you. This makes it harder to understand what’s going on.
- You might not know which experiments to do to get interesting/surprising results
Mess With DNS:
- Gives you a free subdomain you can use do to DNS experiments (like
ocean7.messwithdns.com) - Shows you a live stream of all DNS queries coming in for records on your subdomain (a “behind the scenes” view)
- Has a list of experiments to try (but you can and should do any experiment you want :) )
There are three kinds of experiments you can try in Mess With DNS: “weird” experiments, “useful” experiments, and “tutorial” experiments.
the “weird” experiments
When I experiment, I like to break things. I learn a lot more from seeing what happens when things go wrong than from things going right.
So when thinking about experiments, I thought about things that have gone wrong for me with DNS, like:
- negative DNS caching making me wait an HOUR for my website to work just because I visited the page by accident
- having to wait a long time for cached record expire
- different resolvers having different cached records, which meant I got different results
- pointing at the correct IP address, but having the server not recognize the
Hostheader
Instead of viewing these as frustrating, I thought – I’ll make these into an interesting experiment with no consequences, that people can learn from! So we built a section of “Weird Experiments” where you can intentionally cause some of these problems and see how they play out.
the “useful” and “tutorial” experiments
The “weird” experiments are the ones we spent the most time on, but there are also:
- “tutorial” experiments that walk you through setting some basic DNS records, if you’re newer to DNS or just to help you see how the site works
- “useful” experiments that let actual realistic DNS tasks (like setting up a website or email)
I think I’ll add more examples of “useful” experiments later.
the experiments have different results for different people
One thing we noticed in playtesting was that the “weird” experiments don’t have the same results for everyone, mostly because different people are using different DNS resolvers. For example, there’s a negative caching experiment called “Visit a domain before creating its DNS record”. And when I test that experiment, it works as described. But my friend who was using Cloudflare (1.1.1.1) as a DNS resolver got totally different results when he tried it!
I was stressed out by this at first – it would for sure be simpler for me if I knew that everyone has a consistent experience! But, thinking about it more, one of the basic facts about DNS is that people don’t have a consistent experience of it. So I think it’s better to just be honest about that reality.
giving “behind the scenes” explanations
For some of the experiments, it’s not really obvious what’s happening behind the scenes and I wanted to provide explanations at the end.
I often make comic to show how different computers interact. But I didn’t feel like drawing a bunch of comics (it takes a long time, and they’re hard to edit).
So we came up with this format for showing how the different characters interact, using icons to identify each character. It looks like this:
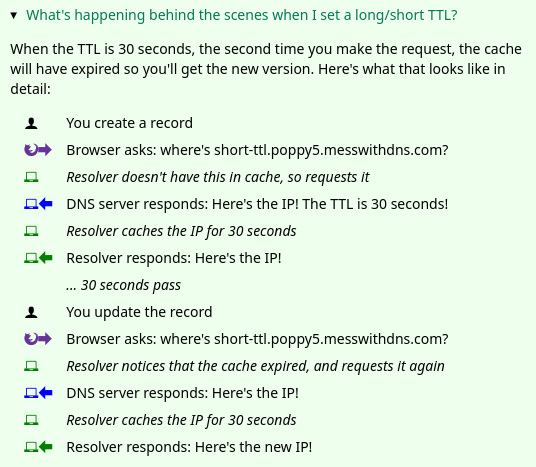
Honestly I think this could probably be made clearer and I don’t love the design of the icons, but maybe I’ll improve it later :)
Okay, that’s everything I have to say about the experiments.
design is hard
Next, I want to talk about is the website’s design, which was a challenge for me.
I built this project with Marie Claire LeBlanc Flanagan, a friend of mine who’s a game designer and who thinks a lot about learning. We pair programmed on writing all the experiments, the design and the CSS.
I used to think that design is about how things look – that websites should look nice. But every time I talk to someone who’s better at design than me, the first question they always ask instead is “okay, how should this work?”. It’s all about functionality and clarity.
Of course, the site isn’t perfect – it could probably be more clear! But we definitely improved it along the way. So I want to talk about how we made the website more clear by doing user testing.
user testing is incredibly helpful
The way we did user testing was to observe a few people using the website and get them to narrate their thoughts out loud and see what’s confusing to them.
We did 5 of these tests (thanks so much to Kamal, Aaron, Ari, Anton, and Tom!). We came out of each test with like 50 bullet points of notes and possible things to change, and then we needed to distill them into actual changes to make. Here are 3 things we improved because of the user testing:
1. the sidebar
One thing we noticed was – we had this sidebar with experiments people could try. It looked like this, and I originally thought it was okay.
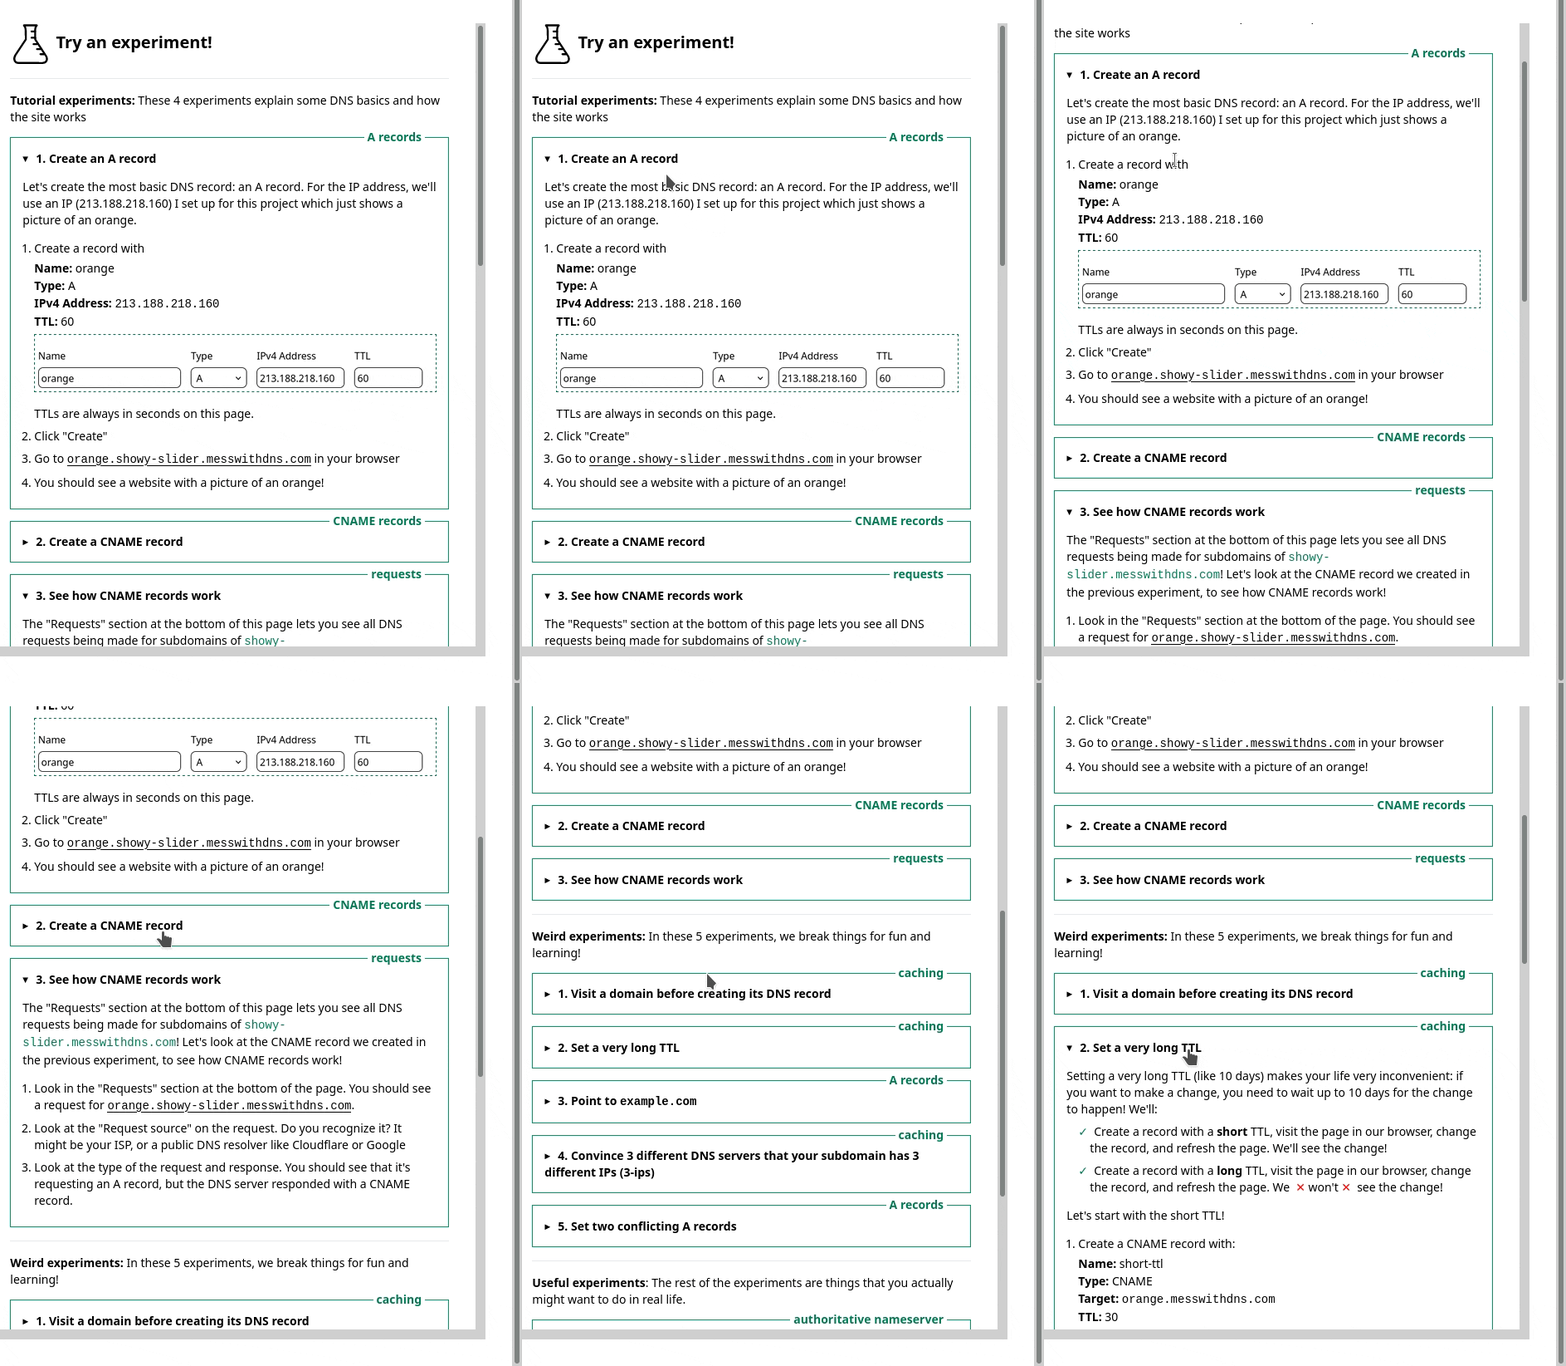
But in the user testing, we saw that people kept getting confused and lost in the sidebar. I really didn’t know how to improve it, but luckily Marie is better at this than me and we came up with a different design that better isolates the information about each experiment. Here’s a gif:
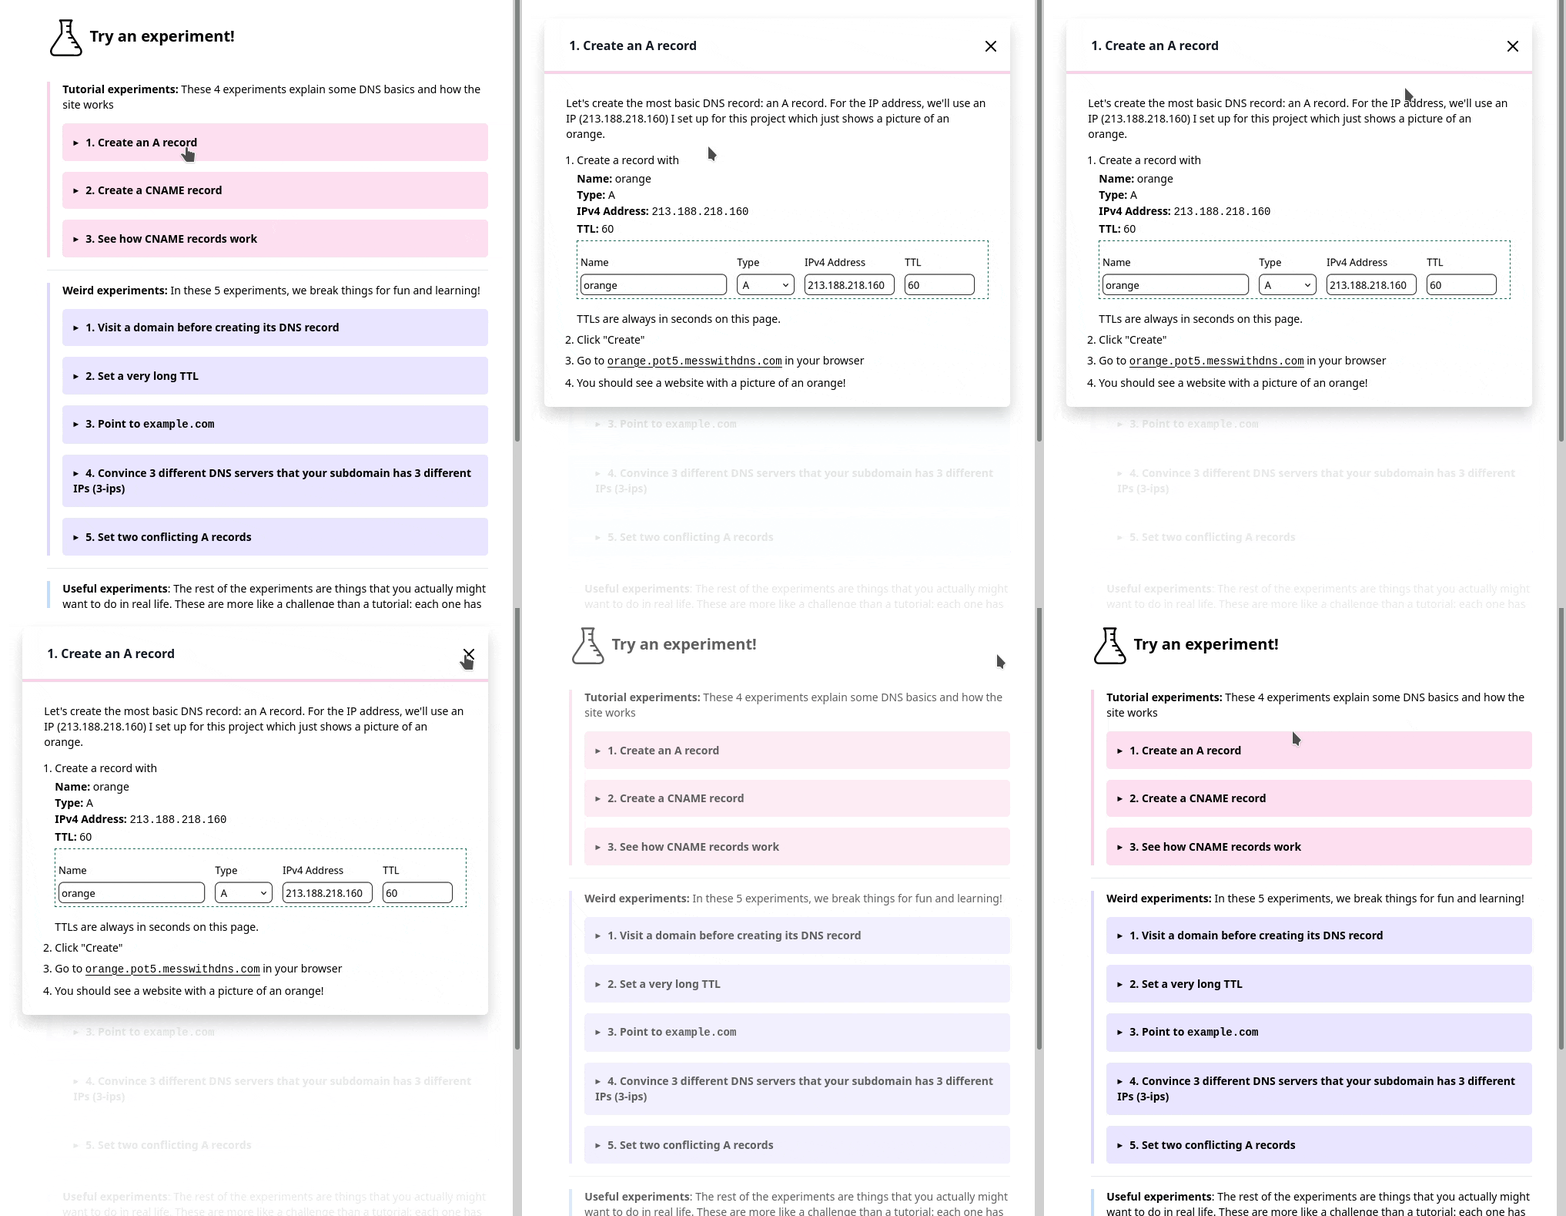
Also, everything in that gif implemented in pure CSS with a <details> tag which I
thought was cool. (here’s the codepen I learned this from)
2. the terminology
Another thing we learned in user experience testing was that a lot of people were confused about the DNS terms we were using like “A record” or “resolver”. So we wrote a short DNS dictionary to try to help with that a bit.
3. the instructions
Originally, in the instructions I’d written something like
Create a CNAME record that points visit-after.fox3.messwithdns.com at orange.jvns.ca with a TTL of 3600
In the playtesting, we noticed that people took a long time to parse that sentence and translate it into which fields they needed to fill in. So we changed the instructions to look like this instead:
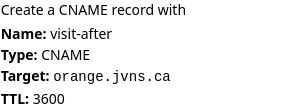
That feels a lot clearer to me.
That’s all I’ll say about the design, let’s move on to the implementation.
frontend test automation is amazing
Even though it’s pretty small, this is a bigger Javascript project than I’ve done previously. Usually my testing strategy for Javascript is “write a bunch of terrible untested code, manually test it, hope for the best”.
But when taking that approach this time, I kept breaking the site and I got a familiar feeling of “JULIA, you need to write TESTS, come on, this is ridiculous”.
I know about frontend test automation frameworks like Selenium, but I hadn’t used them for ages. I asked Tom what I should use, he suggested Playwright, so I used that and it worked great.
All of the Playwright tests are integration tests which is really helpful – even though it’s a frontend testing framework, the integration tests have helped me find a bunch of bugs on the backend too.
Here’s an example of one of my tests, that makes sure that when I make a DNS request to the backend it appears in the frontend. (This one broke just the other day when I was refactoring the backend!)
test('empty dns request gets streamed', async ({ page }) => {
    await page.goto('http://localhost:8080')
    await page.click('#start-experimenting');
    const subdomain = await getSubdomain(page);
    const fullName = 'asdf.' + subdomain + '.messwithdns.com.'
    await getIp(fullName);
    await expect(page.locator('.request-name')).toHaveText(fullName);
    await expect(page.locator('.request-host')).toHaveText('localhost.lan.');
    await expect(page.locator('.request-response')).toContainText('Code: NXDOMAIN');
});
I won’t really explain the details but hopefully that gives you a basic idea. These tests are still a little flaky for reasons I don’t quite understand, but I think maybe that’s normal with frontend automation? I’ve found them pretty easy to write, pretty reliable, and super useful.
Okay, now let’s move to talking about the backend, which was more in my comfort zone. This was fun to build and there were a bunch of things I thought were interesting.
I’ve put a snapshot of the backend’s code on GitHub if you want to read it.
the authoritative DNS server
I needed to write an authoritative DNS server, and I took my usual approach when trying to do something I haven’t done before:
- start with an empty program that does almost nothing (copied from How to write a DNS server in Go)
- read 0 documentation and just start implementing stuff
- see what breaks
- Begrudgingly read a little bit of documentation to fix things that break
I used this wonderful DNS library https://github.com/miekg/dns which I used previously for the backend of https://dns-lookup.jvns.ca/.
Here’s what my main ServeDNS function looks like, with some error handling and logging removed:
func (handle *handler) ServeDNS(w dns.ResponseWriter, request *dns.Msg) {
    // look up records in the database
	msg := dnsResponse(handle.db, request)
	w.WriteMsg(msg)

    // Save the request to the database and send it to any clients who have a websocket open
	remote_addr := w.RemoteAddr().(*net.UDPAddr).IP
	LogRequest(handle.db, r, msg, remote_addr, lookupHost(handle.ipRanges, remote_addr))
}
following the DNS RFCs? not exactly
I think I’m doing a pretty bad job of following the DNS RFCs. Basically my algorithm for which records to return is:
for which DNS response code to return:
- return
NXDOMAINif I don’t have any records for a name, andNOERRORif I do have a record - return a
REFUSEDerror if someone requests a name that doesn’t end with.messwithdns.com. - return
SERVFAILif I run into some kind of error like not being able to connect to the database
for which queries to return:
- if I have a
CNAMErecord for a name, then return it no matter what query type is requested - if I get a
HTTPSquery, return any A/AAAA records I have. (I’m doing this because it’s what Cloudflare seems to do and I get a lot of HTTPS DNS queries, I spent a few minutes trying to read the IETF draft about what HTTPS queries are and I couldn’t really understand it so I gave up) - otherwise just return any records that match the requested type
Hopefully that’s close enough that it won’t cause any major problems. I think
there are some rules I’m not following, like if there’s already an A record
for a name I’m not supposed to let people set a CNAME record. But I’m lazy so
I did not implement that.
I did find this test suite for an authoritative DNS server which I might spend more time looking through later.
live streaming the requests with websockets and Go channels
I wanted people to be able to livestream all requests coming in for their domain. When I was first thinking about how this works, I started googling things like “firebase” and “google pubsub” and “redis” and other pub/sub or streaming systems. I started implementing it this way but then I was having trouble getting it to work and I thought… wait… I don’t want to deal with a separate service!
So instead I wrote 60ish lines of code using Go channels (stream.go). Basically every time someone opens a websocket, I create a Go channel and store it in a map. Then whenever a DNS request comes in, I can just send it to all the channels that are waiting for requests.
This seems to work great. Originally I was using SSE (server side events) instead of websockets, but for some reason it wasn’t working on one friend’s computer so I switched to websockets and that seems more reliable.
tradeoff: no distributed systems, but slower response times
Implementing my pub/sub system with Go channels means that both the DNS server and the HTTP server need to live in a single process, and so I can’t run multiple DNS servers.
Right now the single process is in Virginia, so that means the HTTP API and DNS responses are going to be slower if you’re in Tokyo or something. I decided this was okay because it’s an educational site – it’s ok if it’s a little slow!
And this means I don’t need to deal with any distributed systems, which is amazing. Distributed systems are very annoying.
The static files for the frontend are distributed though: I put the site behind a CDN which should help make everything feel faster.
finding out who owns IP addresses with an ASN database
When a DNS requests comes in, it comes from an IP address. I wanted to tell users who owns that IP address (Google? Cloudflare? their ISP?). The obvious way is to do a reverse DNS lookup. But what if that doesn’t work?
I started out by using an API to look up the owner of an IP. This worked great, but then, similarly to with the pub/sub question, I thought – why rely on an external service? I bet I can do this myself without taking a dependency on an API that might go down.
So I googled “asn database download”, and I found this free IP to ASN database which lists every IP address and who it belongs to.
Then I just needed to implement a binary search (well, technically it was mostly Github Copilot that implemented a binary search, I just fixed the bugs), and I could look up the owner of any IP super quickly.
So the IP address lookup code does a reverse DNS lookup and then falls back to the ASN database.
some notes on picking a database
I started out using planetscale because they have a free tier and I love free tiers.
But then I realized that my application is very write-heavy (I do a database write every time a DNS request comes in!!), and their free tier only allows 10 million writes per month. Which seemed like a lot initially, but I’d already gotten 100,000 DNS queries while it was only me using the service, and suddenly 10 million really wasn’t feeling like that much.
So I switched to using a small Postgres instance with a 10GB volume. I think that should be a reasonable amount of disk space because even though I store a lot of requests, I don’t actually need to store the requests for that long – I could easily clear out old requests every hour and it probably wouldn’t make a difference.
The data volume is attached to a stateless machine running Postgres that I can easily upgrade to give it more CPU/RAM if I need to.
I’m also excited about using Postgres because my partner Kamal has a lot more experience using Postgres than me so I can ask him questions.
let’s talk about security
Like with the nginx playground, I
had some security concerns. When I started building the project, I set it up so
that anybody could set any DNS record on any subdomain of messwithdns.com.
This felt a little scary to me, though I couldn’t put my finger on exactly why
initially.
Then I implemented Github OAuth, but that felt kind of bad too – logging in adds friction! Not everyone has a GitHub account!
Eventually I chatted with Kamal about it and we decided I was concerned about 3 things:
- Accidental collisions where 2 people get assigned the same subdomain and get confused
- People trying to create phishing subdomains
- I wanted people to get short, easy-to-type in domains
So I wrote a simple login function that:
- Generates a random subdomain like
ocean8that’s never been used before - Saves
ocean8to a database table so nobody else can take it - Sends a secure cookie to the client (using
gorilla/securecookie) - Then the user (you!) can make any changes you want to
ocean8.messwithdns.com.
Also the website’s domain (https://messwithdns.net)
is hosted on a different domain entirely than the domain where users can set
records (which is https://messwithdns.com). So that means that if someone somehow does set a record on messwithdns.com at least it won’t take the site down.
some static IP addresses
One more quick note about the experiments: I wanted to have some IP addresses people could use in their experiment if they wanted. So I set up two static IPv4 addresses: orange.jvns.ca and purple.jvns.ca. They show a picture of an orange and some grapes respectively, so you can easily see which is which.
It’s important that each one has a dedicated IP address because they’ll be accessed using a bunch of different domains, so I couldn’t use the domain name to decide how to route the request.
that’s all
I hope this project helps some of you understand DNS better, and I’d love to hear about any problems you run into. Again, the site is at https://messwithdns.net and you can report problems on GitHub.